Monday, December 10, 2012

WBR Fibreglass Reefer Van

This project started several months ago after discussing decals that Westland Models were preparing.  I casually mentioned that I had started building a WBR quite a while ago, it was still unfinished and surely wouldn't be too difficult to complete it now that decals were being produced. 

The 3 WBR's were introduced by WAGR in 1967 and built on the standard 42” under-frame with the mechanical refrigeration unit and fuel tank at one end.  
WBR 23431 new at Midland Workshops - J Gaspari collection
WAGR Outline Drawing
Article from "Railway Transportation" May 1968 - J Gaspari collection
By the late 1980's they were no longer in use but Westrail reclassified 2 of them as SB class to act as spacer vehicles for tanker trains; the refrigeration equipment had been removed and a through air brake pipe was added for compatibility with air braked wagons. They ended up covered in graffiti and generally in very bad condition.
SB 23432-G at Forrestfield 10 Nov 1991
When the model had been started over twenty years ago it was planned to represent an SB complete with one of the side doors missing & the graffiti.


Model of SB prior to back dating to WBR

Model Construction

To make the model of the WBR meant filling in the door, building the refrigeration unit, fuel tank etc. and of course applying the newly available decals.  

The body had been scratch built from sheet styrene & the under frame was cast in fibreglass resin from my own pattern. The commercial parts were Kadee couplers, North Yard wheels & American Models bogies re-gauged to 16.5mm. The fuel tank, end frames, temperature gauges on the side & "fridge" were made from Evergreen styrene tube & shapes. 


The radiator on the fridge was cut down from a copy of a 1:20 Formula 1 model kit part, that I had made a rubber mould from & the two red refrigerant containers were turned on a lathe from PVC rod. The vacuum brake pipes were made from guitar wire and soldered to brass wire uprights. The handrails were formed from Tichy 0.4mm phosphor bronze wire with the help of a Keiran Ryan Models handrail bending jig (purchased from Railwest) and Detail Associates flat brass strip was used to form the side steps and lamp brackets at the ends.


The model was airbrushed using Vallejo acrylic primer as a base and Tamiya acrylic for the top coat, each thinned with their respective thinners. The black for the under-fame and bogies was lightened with about 10% white, so that it is not too dark. I used a gloss white for the body as the decals adhere better to a glossy surface and Microscale Decal Set was used to settle them down to the paint.
To simulate the stainless steel rubbing strips to the right of the doors, I airbrushed silver enamel paint on blank decal paper and cut into strips; the thin coat was very fragile and the paint broke apart along the edges. The second attempt by brush painting the decal paper was more robust.

To make it easier to paint the different colours on the fuel tank, fridge, radiator etc. the parts were kept separate and attached using strategically placed 2 & 3 mm diameter rare earth magnets bought on eBay. After numerous test fittings during construction they were snapped into place after painting.  

Finally a coat of Vallejo flat varnish was applied to seal & protect the model.


Whilst my current modelling era is modern image it has been good fun to finish this model after it having sat idle for so long, it all got kicked off again with those new decals, thanks Rob!

GS

Monday, December 3, 2012

Brake Van Z9

WestOzModels Z9  
On the 15th of March 1883, the Western Australian Government Railways placed an order with the Metropolitan Railway Carriage and Wagon Co. of Birmingham England, for 4 bogie type carriages. With their steel underframes and timber panelled bodies and longitudinal seating arrangements, they were much heavier and longer than the earlier carriages already in use. They were the first cars on the WAGR to have gangways between the end platforms allowing passengers to move from one car to the next. This arrangement with platform ends gave the cars a similar look to the contemporary American carriages of the day and thus they became known as “American” cars # 8 – 11. In 1885 a further 6 “Americans” entered service and they were all classified “AB” and then later altered to “ABA”. In the 1900 reclassifications they were grouped with the American built “Gilbert” cars as the “AG” class.

In 1905 three of the original Americans (9,12 & 17) had brake compartments fitted and were sent to Kalgoorlie operating as brake cars on the local trains in the goldfields. By 1921 they had returned to Perth and all 3 cars entered the workshops and were converted into Buffet cars “AGB” class for use on trains which did not justify the use of the larger AV dining cars. The conversions involved the building of completely new bodies in a similar style to the AQ & ARS cars. The most obvious changes included a wider car body and the “Bull nose” style roof. Each AGB could accommodate 24 diners in the ornately finished, varnished timber saloon areas.
By 1935 the Buffet Cars had become redundant due to continual loss of revenue and once again the 3 AGB cars entered the Midland 
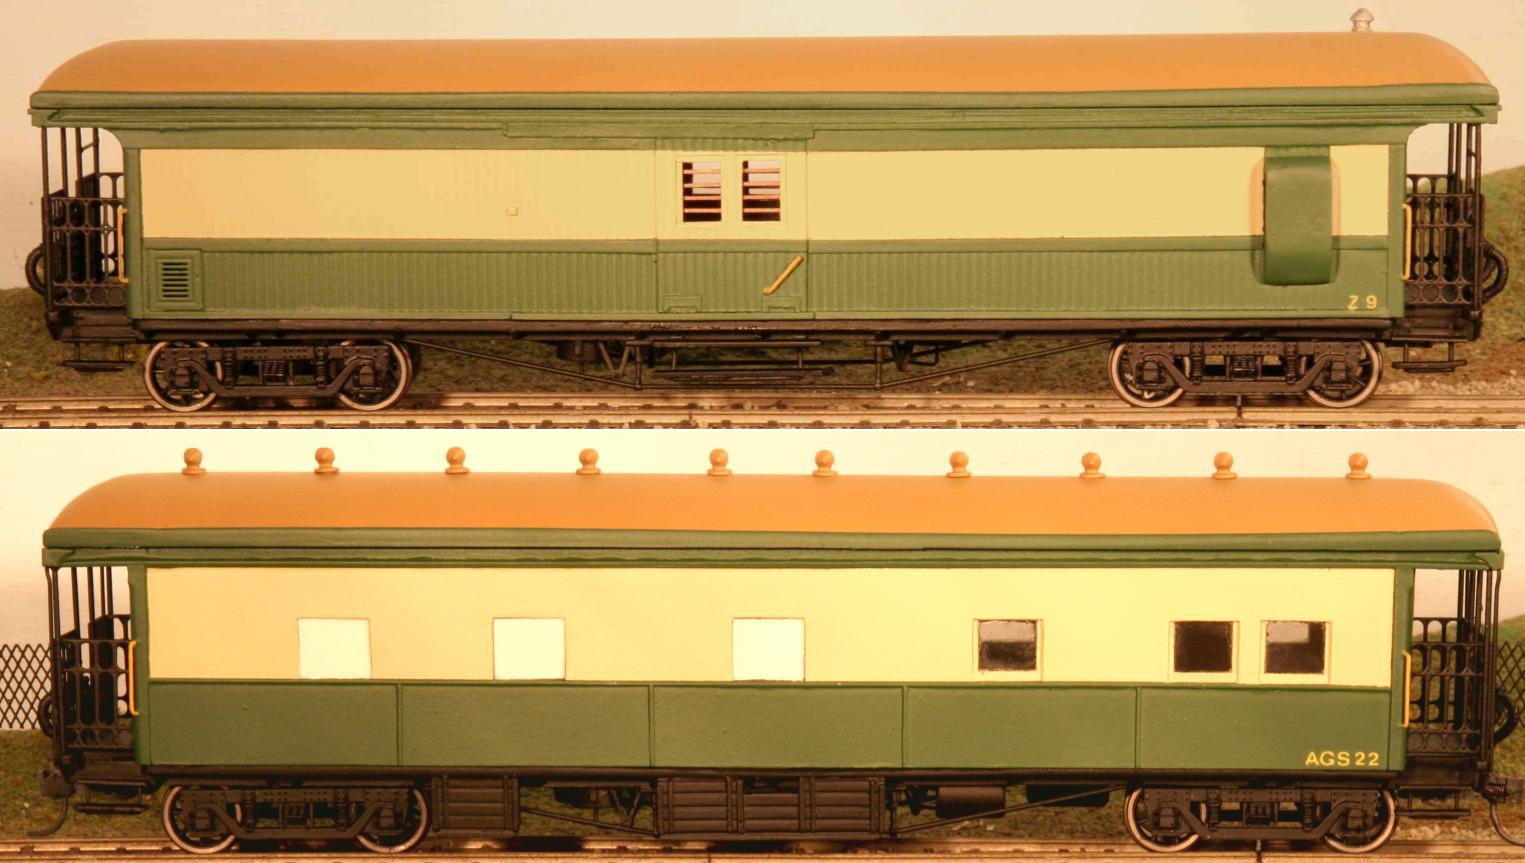
Workshops. #17 was converted to “Shower Car”  AGS 22. #12 was converted to a survey car as AGB 2 later to become AL2.
Z9 at BHP's Kwinana siding, on a ARHS tour train  - Rail Heritage WA Collection - P6549
AGB 9 re-entered service in 1938 as a suburban brakevan classified as AGV 9 retaining its body style, however this conversion was not successful in this form and it was rebuilt with tongue and groove match wood sides to its current configuration, losing all of its side windows. In addition it had a brake compartment with guards lookouts fitted along with dog boxes and centrally located sliding doors, and was re-classified Z 9 in October 1938 when it was then transferred to wagon stock for use as a general brakevan.
Z9 - WAGR Outline Drawing
Z 9 soon found a new lease of life with operation on “Reso” (Resources) trains throughout the Eastern, Southwestern and Southern districts of Western Australia. Its icebox & food storage capacity were found to be most suitable on these services. In 1975, Z 9 was exclusively used to convey frozen & perishable traffic from Perth to Narrogin. When this service ceased in 1976, the brakevan was then used specifically on Perth suburban goods services. In later years it was commonly used on specials and also extended tours by the Australian Railway Historical Soc.
Z9 On and ARHS tour at Bringo - Rail Heritage WA Collection - T3984
During its life, changes to this vehicle since 1938 have essentially been the changes of colour scheme. In the mid 1950’s the Indian red livery gave way to a coat of all over of larch green. This colour remained until the larch green and cream colour scheme was applied early in the 1960’s. In 1983 the standard Westrail “yellow” colour scheme was later applied in which it remained until its withdrawal from service. During the mid 60’s the roof ventilators and other fittings were removed no doubt when a new roof skin was applied. Time also caused some deterioration with the horizontal side board detail slowly being removed leaving the vertical tongue and groove side and then later the dog box doors being filled in.

Z9 on an ARHS Tour to Nannup 1962
In 1985, Z 9 became surplus to Westrail’s requirements & Z9 was purchased by Hotham Valley Tourist Railway. Before being withdrawn from active service at 101 years of age, it was the oldest piece of rollingstock operated by Westrail. Today Z9 resides undercover at the Hotham Valley Tourist Railway depot at Dwellingup. It has seen use on many mainline tours with HVTR travelling over much of the state rail narrow gauge network, as far east as Newdegate, south to Albany and  Pemberton and north to Geraldton.
Z9 is recognised as a historical and iconic item of preserved WAGR rollingstock.

Z9 - The Model

WestOzModels Z9
During early 2010 I commenced down the path of researching and producing a model of AGS 22  the WAGR shower car (as previously blogged). At the time I was convinced by others in the S scale group that I should have a go at producing the AGS as a urethane kit, and so after some deliberation I decided to give it a go. With the basics of the AGS body framework complete, I decided that I would replicate that framework again to build a model of Z9 at the same time, as I considered that this was then a easy scratchbuild using castings of the floor and roof parts from the AGS project to achieve a model of sister car Z9. I also considered that it was an easy scratchbuild for anyone else to produce and thus not worthwhile progressing into a kit of its own. Construction of these two cars would compliment my ARS, AQZ and AV cars to enable operation of a “Reso” style train. Work on these projects continued throughout the winter and in Oct 2010, the Z9 scratchbuild and the AGS 22 kit prototype were completed, with the AGS kit released for sale to members of the S scale group at the November meeting.
Scratchbuilt Z9 and AGS 22 kit completed in 2010 
During the following months some needling by group members took place, asking me to consider making a kit of Z9, something I was not really keen to do as I now already had a model of this vehicle. To make a kit would mean doubling up and I really wanted to move on and so consideration turned to some other projects until early in July 2012, I found some interesting pictures of Z9 (above) whilst scanning through the “Rail Heritage WA Archive Photo Gallery”. The main picture (P-6549) showed a version of Z9 I had not seen before and made me realise that most existing models made of Z9 were based on a much later 70’s – 80’s period and in the form we know it to be, in preservation today. Further research revealed a much nicer version of Z9, with roof and car body detail that I could not resist, and so later in July, armed with measurements I had taken from the real Z9 at HVTR’s Dwellingup carriage shed on a previous visit, work commenced on patterns for a new model/kit.
New side patterns for Z9 kit
As the model would use parts from the previous AGS kit, it only required making patterns for the 2 car body sides and the end wall. Existing AGS parts included the roof, floor/underframe and the platform end decking. These patterns were retrieved from storage and prepared for use whilst making the new parts. This enabled a new Z9 version to come to life relatively quickly with the first roof, side and end castings being turned out in the middle of August and a prototype body was soon assembled. 
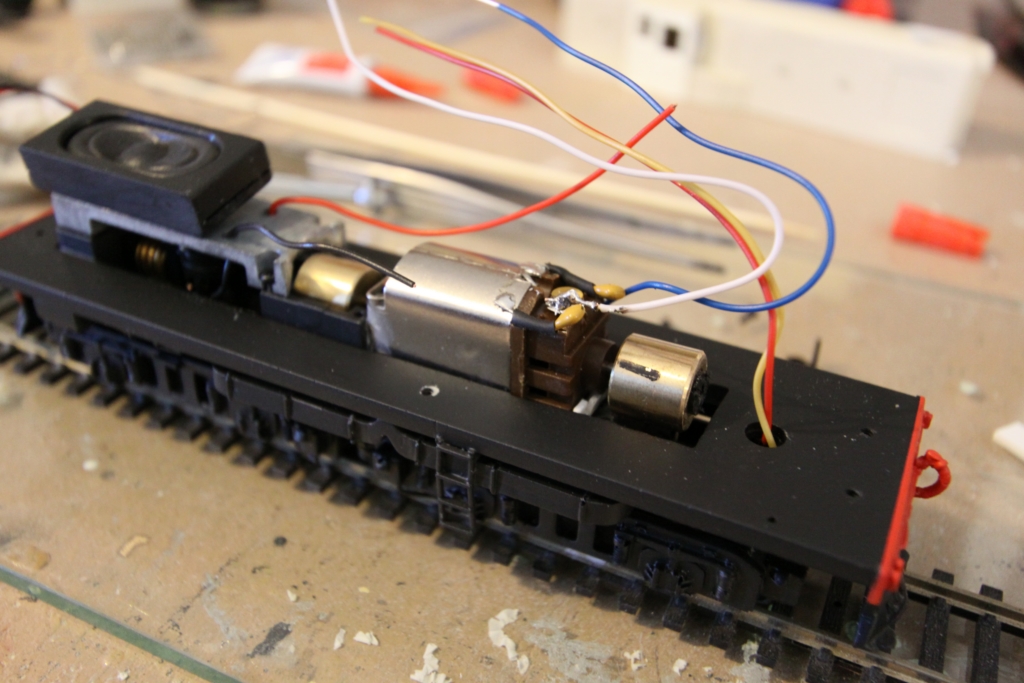
Basic assembled body next to an AQZ
Some time was then taken organising a new brass etch for a “lazy S” style gate to enable the car to have suitable platform end gates. The new gate etch arrived in late October and work recommenced on completing the prototype for the Z9 Kit.
Gates, underfloor roof and general detail added - ready to paint 
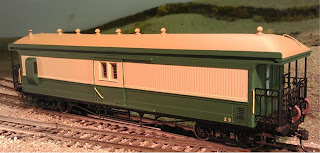
After spending the first week of November in the paint shop, the new Z9 was completed, exactly 2 years to the day from my first Z9 scratchbuild. Kits became available at the November S scale meeting that following week.
Painted Lazy S End gates
Although I never intended to produce a second model of Z9, I am now happy that I did. The project has helped me to improve my skills and enabled a much better model than the one I originally scratchbuilt. It also caused me to look at and explore some other areas of modelling which I had not considered previously, so it ended up being a worthwhile exercise.
Completed Z9 kit prototype.


This kit by WestOzModels is now available, although stocks are limited.

Essentially it is a "Body" kit only, with some detailing parts (specific to this car) included.

The modeller will need a basic grounding in assembling of urethane kits and a reasonable level of modelling skills to complete the model.


Prototype information complied from “A History of WAGR Passengers Carriages” by A. May and B. Gray and


Sunday, November 18, 2012

SIGnallingWA

For those interested in signals, signal boxes etc. check out the new site from Chris French.

To find specific signal cabins look in Signal Cabins of WA - Archive, even better buy the book in the Shop.

A must for the modeller of the WAGR in any scale.

http://www.sigwa.info/index.html

Rail Heritage WA - P6777

Signals, signal box, Box "B", Midland


Monday, October 29, 2012

AY- AYB models Early Livery

Here is a couple of pics of some modelling done by Ross Green who has been with the S scale group for some time now. Ross has built these AY & AYB cars using WestOzModels kits, to run with his Dd & Dm suburban tank locomotives which he has previously scratchbuilt.
 Ross has chosen to paint his cars in the earlier Larch Green, Light Green, Cream and White livery which the carriages wore when they first entered service in 1945.
Ross remembers travelling in these carriages in this colour scheme as a young lad and wanted to recreate that period for his models.
There was much discussion, questioning and research that took place before paint was applied, as to what would be the correct combination of colours & how/where it would be applied to areas on the carriage.
Ross has mostly completed these models and brought them along to the recent running night to show others where he was at with the project. I think we all look forward to seeing this train of carriages running with one of Ross' D class tanks at the head of the train. 


Tuesday, September 4, 2012

X Class Locomotives


Fine tuning the bogies of an X-Class Models S scale model of an X class loco.

A number of modellers who have bought one of my X class kits over the past six years have commented that the bogies do not stay on the track. If this is the case I am fairly sure I know what is wrong with your bogies.

The radius for each of the radial arms which serve the bogies will not be the same length. The bogies have to sit exactly dead centre in the space of the short concave main frames above the bogies, or below the bogies if the loco is sitting upside down on your workbench. The radius is then measured to a central point just in front of the power bogie. At this point I place a 15mm 8BA machine screw in a 2mm hole. I then measure back to the pivot point centre of the bogie bolster which needs to sit upside down to get this measurement.

On the last X class I assembled, the radius is 30mm for one radial arm but the other one is 1mm shorter at 29mm but you will need to measure yours. It depends on where you drill the hole in front of the bolsters at each end of the rigid 8 wheel mechanism. I make temporary radial arms from 1mm styrene 4.5 mm wide, drilling a hole at each end to suit the two different desired radii until I get it right. The holes in the radial arms should be at least 2.5mm dia to take a 2mm or 8BA screw so it pivots freely, otherwise this will catch which is another cause for derailment of the bogies on curves or through reverse curves such as points.

Also the radial arms should sit as horizontally as possible so that the pivot holes at each end dont catch on the screw. Thus the fairly long screw in front of the drive bolster. Given all this, then the side frames of the bogies should not foul the mainframes below the driver’s cabs.

To provide added weight to the bogies, on the bottom side of the bogies I fit and stick a sheet of lead 35mm x 12mm x 1mm thick on the flat side of the bogie, the side facing the track ballast. Also, the brass bearings need to be at least 13.5mm long so you have slight, but minimal wheel and axle slop.

I have an unpainted X which "flies" around both my track and the Swan View layout at the AMRA clubrooms, because I have got these details just right, mainly through trial-and-error. You can use your own radial arms and not use the ones made with the kit. Brass radial arms would be even better.

 The back-to-backs of the wheels need to be checked as well and this can be done using an NMRA track and wheel gauge which is an invaluable tool in the modeller’s kit bag.

I can and usually do bring my unpainted X class to our monthly meeting so you can see what I'm talking about. You can email me to remind me to bring it.   meanwhile I hope this helps you. 

Meanwhile, a couple of photos may help....... or not.


Tuesday, August 28, 2012

Latest Finished products....

Well I have spent a few days "finishing off" the last few items on my Y class. Sound is fitted (Tsunami Baldwin VO), lights wired and people in the cab. Runs and sounds great, perhaps needs a little more weight but it loooks the part. I still need to fit the numberplates when I eventually get them.

Although I had finished the XA some time ago, its still needed some detail. After fitting the sound chip (Tsunami Fairbanks Morse) and speaker, I added the crew, the pull down blinds in the front, made some window wipers for the windscreen, added the handrails and steps. I also fitted the fan cover  (made from a tap aerator) inside the lip on the roof to make it flush with the body.

Im very happy with the end result.

Monday, July 30, 2012

Watheroo Engine Shed


Watheroo on the Midland Railway of WA

Watheroo is a small town and railway location on the Midland Railway line, 185 kms (123 miles) from Midland, or almost halfway between Midland and Walkaway. The MR was a privately owned railway before it was absorbed by the WAGR in 1964. 

In earlier days Watheroo station yard would have seen quite a lot of activity. Apart from the 300 ft platform and brick station buildings, the yard also boasted a coaling tower, water tank, turntable (later replaced with a triangle) and a loading ramp and crane. There was also a substantial wheat bin. The station and station buildings and engine shed, built in 1941, still stand in the railway yard. The Engine shed is used for storage and for unloading road vehicles while the station building currently serves as a tavern.
 
The engine shed, which was the second to have occupied the site is a distinctive and unique building in its design and construction. It incorporates the use of concrete pillars and purlins with an infill of clay brick. The present shed replaced a previous timber and iron building. As the engine shed is still standing and has been partly restored in recent years, it provides an excellent modelling opportunity.

The following photos show the prototype and the model of it.  The model is built in styrene card and balsa strip. The brick infill uses brick paper which covers the plastic card. The brick paper was downloaded from the paperbrick website.

MRWA loco C class, loco shed, coal stage, loco depot Watheroo 
Rail Heritage WA Collection P5744

Watheroo Engine Shed November 2011. Photo Graham Watson
                                               
Model of Watheroo Engine Shed in S scale.

Saturday, July 28, 2012

Installing a sound decoder in a Railwest WAGR Y Class Locomotive


Since finishing my  WAGR Y class locomotive from Railwest Models, I thought I would upload some pictures showing the modifications I made to fit the motor, the motor mount and lead weight. Its also interesting how I was going to install the sound decoder, showing wiring and position of the speaker....

Hope this is of some help to those still in the construction stage.

The small video clip is the final product, with sound. Its a great little kit!

Saturday, July 14, 2012

The Models of Allen Howe


At the recent July 2012 meeting of the Sn3½ special interest group of the AMRA WA Branch, the scratch-built models of Allen Howe were shown to the members. Though he started modelling relatively later in his life, Allen is a very accomplished modeller of the WA 3’6” system in the period 1940-1972.

Aside from the many WAGR kits which he has assembled, Allen has built at least eight steam locomotives in brass. Allen has also built four suburban side-door coaches in styrene and brass.during the period 1990 through 2006, during his retirement and following a long career with the WAGR.  The locomotives include two Pm, two P class, 3 D class locos (a DD, DM and a D) and an Australian Standard Garrett locomotive. Allan is probably the first to successfully attempt and complete a scratch-built model of an ASG in S scale. It was a major achievement and not to be tackled by the inexperieced model builder. Allen's ASG ran smoothly and successfully at several AMRA Model Railway exhibitions before and after 2002. The locomotive had the power and traction to haul very long consists as the prototype was designed to do.

Allen's models show great attention to detail drawing on his long and vast experience as a tradesman at the Midland Workshops.  An article is planned for the Australian SN Modeller magazine in the near future but in the meantime, the following three photos of Allen’s models provide a taste of his modelling work.


Allen's Howe's ASG emerging from Swan View tunnel 2002

Four of Allen's suburban coaches on S Mackay's layout

A fine example of Allen's D class locomotive on Swan View - Bill Gray photo.

AYB Suburban Brake

In 1945 as part of the WAGR rehabilitation program after WW2, a new set of six suburban cars including 4 AY’s and two AYB’s (#456 – 457) were built. Another set was built in 1946 including 2 AYB’s (458 & 459) and 2 AY cars. The AYB’s were basically an AY with a guards compartment at one end. They were built on steel underframes with matchboard sides and entered service in a larch green, light green & cream livery and able to accommodate 64 passengers, ably supplementing the ageing fleet of sidedoor/dogbox style cars predominantly in use on the suburban network.
The First class section of a suburban train was always at the Fremantle end and so the AYB at that end of the train was considered to be First Class whilst the AYB at the other end was considered to be Second class, despite there being no difference between the AY and AYB cars internally.

In October 1951 the WAGR chose to introduce a new standard livery for carriage stock, replacing indian red and two tone green and cream schemes, with an "All Over" larch green. In 1952 AYB's 456 & 457 were outshopped in the new Green livery with 458 & 459 following in 1955, During 1956 another livery of White, Green and red stripe had been applied to the railcars, becoming the standard "Suburban" livery. In 1963 this livery was applied to AYB 459 with 456 & 457 repainted in 1966 & 1967. AYB 458 is thought to have retained Green till as late as 1970 by which time both 456 & 457 had been written off in 1969. Modernisation also took place during the 60's with some of the cars losing their matchboard sides, crown light windows and ornate panel work above the windows, these niceties being replaced with plywood panelling in various stages, which for modelling purposes, requires some research by the modeller.

 In 1970's, AYB's 458 & 459 continued into Westrail service with refurbishment and Orange and Blue stripe livery. 1986 saw another refurbishment and a Green and Cream livery which saw them through till January 1991 when they were replaced by electric railcars. These two cars made it to preservation, in use until recently on the Pemberton Tramway.
The above model of AYB 456 has been achieved by kitbashing a WestOzModels "AY" body kit. After some planning and consideration of how to go about it, I set about cutting away sections of the rear compartment area of the AY body sides. Retaining upper and lower panelling, the windows were cut away and the single Guards compartment window was replaced with a window from another scrap AY side. Armed with measurements from the prototype the sides were shortened and new Door and Corner Posts were installed to form the end of the car, followed by panels between the window and doors. A new End was produced along with Guards doors to suit the prototype and then panelling detail was made and applied. I estimate this took about 20 hrs to achieve.
With modifications made to the side walls and a new end made, these were glued down to a base for use as a pattern and then rubber poured over them to make a mould. Once the moulds were dry, the first castings were made. The results are shown here below. Assembly of the first AYB model then took place using a rolled styrene roof.
After application of handrails and underfloor detailing the carriage was sprayed - first with a "Holts" grey auto primer and then colours applied (Humbrol & Revell). When the body paint had dried, handrails were picked out in Yellow and Silver, decals were applied and the car was sealed with a spray of Wattyl Matt Estapol. Windows were then applied using "Microscale Crystal Clear". With the windows dry, the last job was to fit bars to the Guards Door windows and carefully paint them in Yellow.
The pictures here, show the prototype model for the AYB Suburban Brake Car “Body” kit which is now available from WestOz Models.  This AYB "Body" kit is produced in polyurethane and comes with a aluminum roof. All other parts are available from Railwest Models.
The AYB seen here above, is formed from patterns produced by B. Norris for the AY, with kitbashing to AYB form carried out by N. Blinco of WestOz Models.

Prototype information complied from “A History of WAGR Passengers Carriages” by A. May and B. Gray

Monday, June 25, 2012

New source for Pliobond

Pliobond has been used for many years for handlaying track and building turnouts, but it is now virtually impossible to get in Australia other than in industrial quantities.

Thanks to eBay, I tracked down a source from the US in small tubes, which are a convenient size for modelling purposes. Here is the eBay link


It is actually a fishing tackle shop and they sell Pliobond for coating knots, etc.  The good news is that they are happy to send to Australia and it took about 2 weeks to arrive.  I would suggest NOT ordering more than 2-3 tubes in one go as a larger order may attract suspicion from postal authorities as many suppliers will not send glues and paints via airmail.

Each tube is 30 ml, compared the last batch I bought locally which were 50 ml.  The smaller tubes are actually an advantage as it does become more viscous after several years once opened.

As well as tracklaying, Pliobond is a useful adhesive for joining dissimilar materials such as wood to styrene, metal to styrene, and wood to metal.  It usually is used as a contact adhesive by applying a thin coat to both items, letting it dry a bit, then bringing the items into contact and clamping for a while.

For tracklaying, it is only necessary to coat the underside of the rail (flatbottom only) then let it dry for 15 min or longer.  When the rail is positioned on the sleepers (usually wood), heat applied from a soldering iron to the top of the rail softens the dried Pliobond and allows it to stick to the sleepers.  The great thing is that minor adjustments to track gauge, etc. can be made anytime later simply by heating with a soldering iron.  The rail can be precoated well in advance, and the Pliobond is no longer sticky once dry.  Rail precoated with Pliobond lasts indefinitely and can be used any time.