Sunday, January 27, 2013
Andy May's Models
Some pictures of Andy's models can be found at the below address.
Great stuff especially as Andy now resides in England.
http://www.flickr.com/photos/asmay2002/
Tuesday, January 22, 2013
Make A Jig
A "Jig" is a type of custom-made tool used to control the location and/or motion of another tool or item. A jig's primary purpose is to provide repeatability, accuracy, and interchangeability in the manufacturing of products.
In modeling we often spend much time trying to achieve consistency when we build multiples of items . This can be done by using a Jig which is made to suit the application, in our case, it may be bending wire for handrails or assembling bogies or to assist with difficult fitting of parts, a jig will often provide the answer to a multitude of problems.
Most modelers have at some time found a need to make a jig to achieve a result with their projects and so there must be a whole heap of ideas amongst our group which can be shared to hopefully assist newcomers and even old hands.
I would like to encourage all contributors on our Blog to share their "Jig" ideas under this theme of
"Make a Jig"
To kick off, here is a simple little Jig I use for applying the End Bargeboard to Double Skinned Roof carriages.

This little jig is made simply from some styrene strip of .75mm thickness. It is designed to work as a spacer which is placed on the end of the coach to assist with gluing the bargeboard into place, leaving a gap as per the real carriage.
To explain the situation - In picture A below, the brown carriage is modeled to represent a Double Skinned Roof version with the large End Bargeboard. The Green carriage is modeled to represent the carriage after the double skinned roof has been removed. Picture B shows the side view and it can be seen that the double skinned roof (circled) on the AZ carriage extends a bit beyond the end of the carriage to allow for air to flow under the protecting bargeboard and between the roof space. The carriage on the right is the modified single skin roof version and it can be seen that the roof is somewhat shortened.

To make the Bargeboard Jig - Take a straight section of .75mm Evergreen strip styrene and cut it to fit between the roof and side walls of the carriage, then add extensions to reach upwards to the curve of the roof. Glue it all together on a sheet of glass or flat board to achieve a flat Jig.
The Bargeboard Jig is put/rested in place on the end of the assembled carriage body after the roof has been fitted. I then apply small drops of glue to the under side of the roof "between" the extensions, taking care not to glue the jig to the carriage body.

Then slide the curved end bargeboard on top of the jig and press it up under the roof. Once the "tack" spots of glue have dried, remove the jig by carefully sliding it out, then a bead of glue can be applied to the bargeboard and the roof trimmed to match.
The end result should look something like this!

Store your Jig so that it may be used again on a similar project.
Monday, January 7, 2013
WAGR R Class Diesel using 3D Printing
The R class has always been one of my favourite locos and just fits into the 1960's timeframe of my layout.
Over the last few months, I have been working on a model of the R class using 3D printing techniques. While the technology isn't quite there yet at delivering a finish comparable to injection moulding at an affordable price, it does appear to be practical to produce a complete loco using 3D printing, if one is prepared to put up with some imperfections.
No doubt, the technology behind 3D printing will continually improve, so my strategy is to accept the current level of quality as part of the learning process to build a "proof of concept" model. In a few years time when the quality has improved, I can get new "prints" done and get a new, better model for minimal extra effort.
Today, I received my first complete body for the R class as a 3D print from a company in Belgium called i.Materialise.

The major deficiency of the current (affordable) 3D printing processes is that the resolution is not fine enough to get a nice, smooth surface finish. The laying of the material as the model is being "built" results in a roughened "striated" surface and also a "stepping" effect on curved surfaces, particularly, in the case of the R class, on the roof. Whether the quality of surface finish is acceptable depends very much in the individual modeller.
Note the imperfections on the large square radiator intake grille in the form very fine "whiskers". These are due to a minor problem in the design which will be rectified in subsequent prints.

The beauty of the 3D printing process is that virtually all the details can be "printed" as part of the process, providing the details are, of course, built into the 3D artwork in the first place. In the case of the R, it is really only handrails and horns which will have to be added to complete the body detail. I decided to built the raised numbers on the cab side into the 3D design and they appear to have worked fairly well.

This view of the side detail shows the striated effect visible on vertical surfaces. While it would be possible to sand the flat surfaces to get a smoother finish, it would be difficult to do so without damaging the fine details.

This top view shows the stepping effect visible on the curved roof. As my layout is close to "eye level", this effect will not be as obvious when the loco is operating.

I already have a working chassis using a custom-made power bogie from Hollywood Foundry and matching unpowered bogie. The following photo shows the "loco" on the Hollywood Foundry bogies, with very temporary underframe and temporary weighted "fuel tank".
.JPG)
I am currently working on the 3D design for the bogie sideframes and plan to also do the underframe and fuel tank as 3D "prints". The underframe will be designed to take 2 powered bogies, if desired.
Although I have no intention to produce the R class as a kit, there is the option of making the 3D designs "public" through the i.Materialise website so that anyone interested in building an R class can order "prints" for themselves of the major components. I can easily make available the ordering details for the power bogie, etc. from Hollywood Foundry, perhaps as an addendum to this blog. As an indication, the cost from i.Materialise for the 1-piece body as pictured above is $100 + $30 shipping per order. Delivery time is about 2 weeks from ordering.
I don't have any intention to do the design for an RA. There are some major differences between the R and RA, including the RA being longer overall. I estimate it would take about 30-50% additional design time to modify the R design to produce an RA.
Over the last few months, I have been working on a model of the R class using 3D printing techniques. While the technology isn't quite there yet at delivering a finish comparable to injection moulding at an affordable price, it does appear to be practical to produce a complete loco using 3D printing, if one is prepared to put up with some imperfections.
No doubt, the technology behind 3D printing will continually improve, so my strategy is to accept the current level of quality as part of the learning process to build a "proof of concept" model. In a few years time when the quality has improved, I can get new "prints" done and get a new, better model for minimal extra effort.
Today, I received my first complete body for the R class as a 3D print from a company in Belgium called i.Materialise.
The major deficiency of the current (affordable) 3D printing processes is that the resolution is not fine enough to get a nice, smooth surface finish. The laying of the material as the model is being "built" results in a roughened "striated" surface and also a "stepping" effect on curved surfaces, particularly, in the case of the R class, on the roof. Whether the quality of surface finish is acceptable depends very much in the individual modeller.
Note the imperfections on the large square radiator intake grille in the form very fine "whiskers". These are due to a minor problem in the design which will be rectified in subsequent prints.
The beauty of the 3D printing process is that virtually all the details can be "printed" as part of the process, providing the details are, of course, built into the 3D artwork in the first place. In the case of the R, it is really only handrails and horns which will have to be added to complete the body detail. I decided to built the raised numbers on the cab side into the 3D design and they appear to have worked fairly well.
This view of the side detail shows the striated effect visible on vertical surfaces. While it would be possible to sand the flat surfaces to get a smoother finish, it would be difficult to do so without damaging the fine details.
This top view shows the stepping effect visible on the curved roof. As my layout is close to "eye level", this effect will not be as obvious when the loco is operating.
I already have a working chassis using a custom-made power bogie from Hollywood Foundry and matching unpowered bogie. The following photo shows the "loco" on the Hollywood Foundry bogies, with very temporary underframe and temporary weighted "fuel tank".
I am currently working on the 3D design for the bogie sideframes and plan to also do the underframe and fuel tank as 3D "prints". The underframe will be designed to take 2 powered bogies, if desired.
Although I have no intention to produce the R class as a kit, there is the option of making the 3D designs "public" through the i.Materialise website so that anyone interested in building an R class can order "prints" for themselves of the major components. I can easily make available the ordering details for the power bogie, etc. from Hollywood Foundry, perhaps as an addendum to this blog. As an indication, the cost from i.Materialise for the 1-piece body as pictured above is $100 + $30 shipping per order. Delivery time is about 2 weeks from ordering.
I don't have any intention to do the design for an RA. There are some major differences between the R and RA, including the RA being longer overall. I estimate it would take about 30-50% additional design time to modify the R design to produce an RA.
Monday, December 10, 2012
WBR Fibreglass Reefer Van
This project started several months ago after discussing decals that Westland Models were preparing. I casually mentioned that I had started building a WBR quite a while ago, it was still unfinished and surely wouldn't be too difficult to complete it now that decals were being produced.
The 3 WBR's were introduced by WAGR in 1967 and built on the standard 42” under-frame with the mechanical refrigeration unit and fuel tank at one end.
 |
| WBR 23431 new at Midland Workshops - J Gaspari collection |
 |
| WAGR Outline Drawing |
 |
| Article from "Railway Transportation" May 1968 - J Gaspari collection |
By the late 1980's they were no longer in use but Westrail reclassified 2 of them as SB class to act as spacer vehicles for tanker trains; the refrigeration equipment had been removed and a through air brake pipe was added for compatibility with air braked wagons. They ended up covered in graffiti and generally in very bad condition.
 |
| SB 23432-G at Forrestfield 10 Nov 1991 |
When the model had been started over twenty years ago it was planned to represent an SB complete with one of the side doors missing & the graffiti.
 |
| Model of SB prior to back dating to WBR |
Model Construction
To make the model of the WBR meant filling in the door, building the refrigeration unit, fuel tank etc. and of course applying the newly available decals.
The body had been scratch built from sheet styrene & the under frame was cast in fibreglass resin from my own pattern. The commercial parts were Kadee couplers, North Yard wheels & American Models bogies re-gauged to 16.5mm. The fuel tank, end frames, temperature gauges on the side & "fridge" were made from Evergreen styrene tube & shapes.

The radiator on the fridge was cut down from a copy of a 1:20 Formula 1 model kit part, that I had made a rubber mould from & the two red refrigerant containers were turned on a lathe from PVC rod. The vacuum brake pipes were made from guitar wire and soldered to brass wire uprights. The handrails were formed from Tichy 0.4mm phosphor bronze wire with the help of a Keiran Ryan Models handrail bending jig (purchased from Railwest) and Detail Associates flat brass strip was used to form the side steps and lamp brackets at the ends.

The model was airbrushed using Vallejo acrylic primer as a base and Tamiya acrylic for the top coat, each thinned with their respective thinners. The black for the under-fame and bogies was lightened with about 10% white, so that it is not too dark. I used a gloss white for the body as the decals adhere better to a glossy surface and Microscale Decal Set was used to settle them down to the paint.
To simulate the stainless steel rubbing strips to the right of the doors, I airbrushed silver enamel paint on blank decal paper and cut into strips; the thin coat was very fragile and the paint broke apart along the edges. The second attempt by brush painting the decal paper was more robust.
To make it easier to paint the different colours on the fuel tank, fridge, radiator etc. the parts were kept separate and attached using strategically placed 2 & 3 mm diameter rare earth magnets bought on eBay. After numerous test fittings during construction they were snapped into place after painting.
Finally a coat of Vallejo flat varnish was applied to seal & protect the model.

Whilst my current modelling era is modern image it has been good fun to finish this model after it having sat idle for so long, it all got kicked off again with those new decals, thanks Rob!
GS
Monday, December 3, 2012
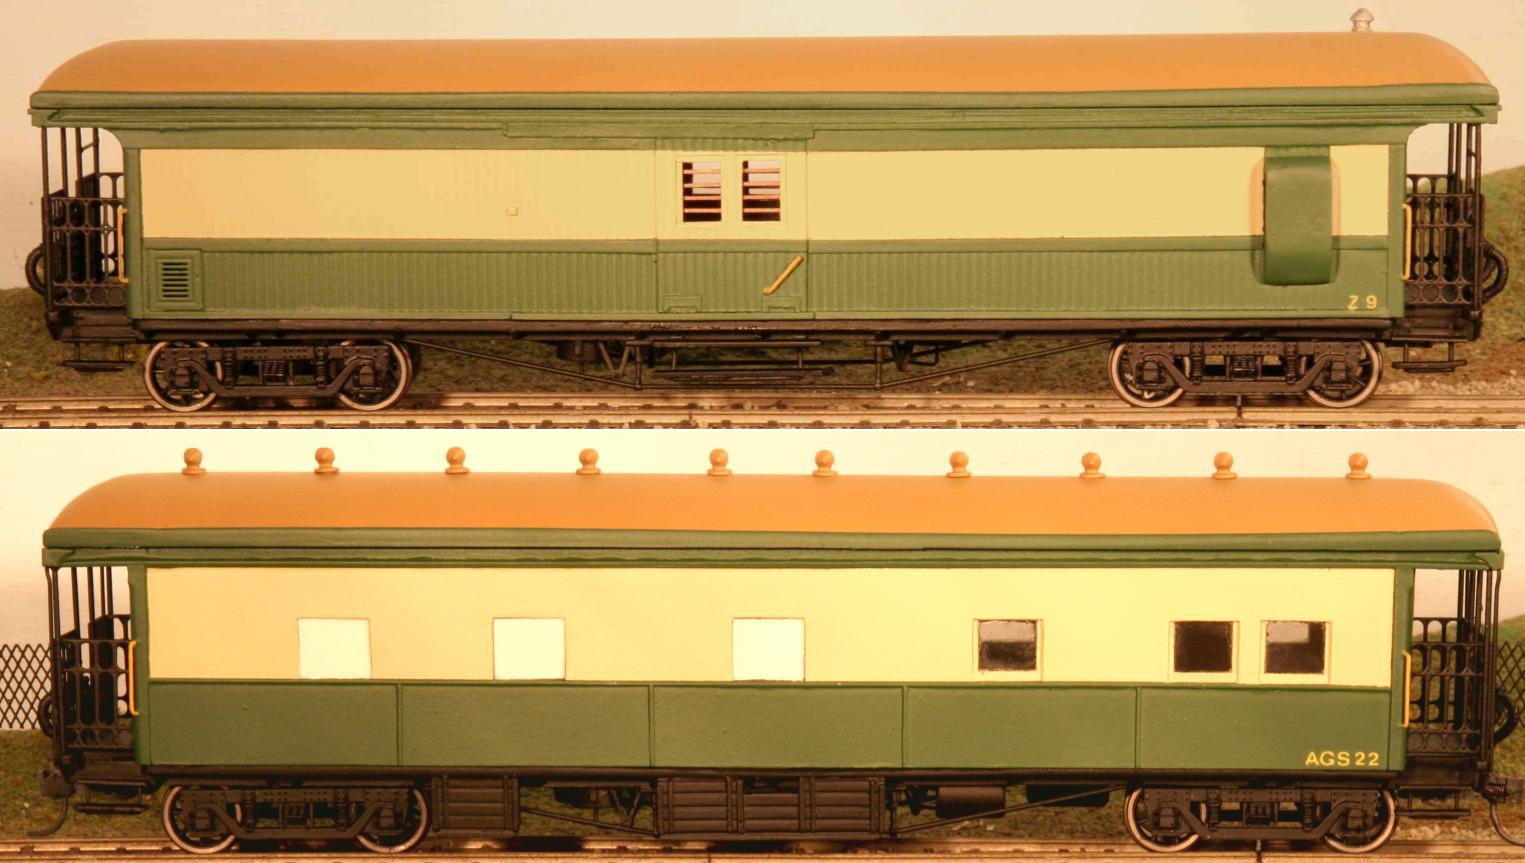
Brake Van Z9
 |
| WestOzModels Z9 |
On the 15th of March 1883, the Western Australian
Government Railways placed an order with the Metropolitan Railway Carriage and
Wagon Co. of Birmingham England, for 4 bogie type carriages. With their steel
underframes and timber panelled bodies and longitudinal seating arrangements,
they were much heavier and longer than the earlier carriages already in use.
They were the first cars on the WAGR to have gangways between the end platforms
allowing passengers to move from one car to the next. This arrangement with
platform ends gave the cars a similar look to the contemporary American
carriages of the day and thus they became known as “American” cars # 8 – 11. In
1885 a further 6 “Americans” entered service and they were all classified “AB”
and then later altered to “ABA”. In the 1900 reclassifications they were
grouped with the American built “Gilbert” cars as the “AG” class.
In 1905 three of the original Americans (9,12 & 17) had
brake compartments fitted and were sent to Kalgoorlie operating as brake cars
on the local trains in the goldfields. By 1921 they had returned to Perth and
all 3 cars entered the workshops and were converted into Buffet cars “AGB”
class for use on trains which did not justify the use of the larger AV dining
cars. The conversions involved the building of completely new bodies in a
similar style to the AQ & ARS cars. The most obvious changes included a
wider car body and the “Bull nose” style roof. Each AGB could accommodate 24
diners in the ornately finished, varnished timber saloon areas.
By 1935 the Buffet Cars had become redundant due to
continual loss of revenue and once again the 3 AGB cars entered the Midland
Workshops. #17 was converted to “Shower Car” AGS 22. #12 was converted to a survey car as
AGB 2 later to become AL2.
 |
| Z9 at BHP's Kwinana siding, on a ARHS tour train - Rail Heritage WA Collection - P6549 |
AGB 9 re-entered service in 1938 as a suburban brakevan classified as AGV
9 retaining its body style, however this conversion was not successful in this
form and it was rebuilt with tongue and groove match wood sides to its current
configuration, losing all of its side windows. In addition it had a brake
compartment with guards lookouts fitted along with dog boxes and centrally
located sliding doors, and was re-classified Z 9 in October 1938 when it was
then transferred to wagon stock for use as a general brakevan.
 |
| Z9 - WAGR Outline Drawing |
Z 9 soon found a new
lease of life with operation on “Reso” (Resources) trains throughout the
Eastern, Southwestern and Southern districts of Western Australia. Its icebox & food storage capacity were found to be most suitable on these services. In 1975, Z 9 was exclusively used to convey frozen & perishable traffic from Perth to Narrogin. When this service ceased in 1976, the brakevan was then used specifically on Perth suburban goods services. In later
years it was commonly used on specials and also extended tours by the
Australian Railway Historical Soc.
 |
Z9 On and ARHS tour at Bringo - Rail Heritage WA Collection - T3984
|
During its life, changes to this vehicle since 1938 have
essentially been the changes of colour scheme. In the mid 1950’s the Indian red
livery gave way to a coat of all over of larch green. This colour remained
until the larch green and cream colour scheme was applied early in the 1960’s.
In 1983 the standard Westrail “yellow” colour scheme was later applied in which
it remained until its withdrawal from service. During the mid 60’s the roof
ventilators and other fittings were removed no doubt when a new roof skin was
applied. Time also caused some deterioration with the horizontal side board
detail slowly being removed leaving the vertical tongue and groove side and
then later the dog box doors being filled in.
 |
| Z9 on an ARHS Tour to Nannup 1962 |
In 1985, Z 9 became surplus to Westrail’s requirements &
Z9 was purchased by Hotham Valley Tourist Railway. Before being withdrawn from
active service at 101 years of age, it was the oldest piece of rollingstock
operated by Westrail. Today Z9 resides undercover at the Hotham Valley Tourist Railway depot at Dwellingup. It has seen use on many mainline tours with HVTR travelling over much of the state rail narrow gauge network, as far east as Newdegate, south to Albany and Pemberton and north to Geraldton.
Z9 is recognised as a historical and iconic item of preserved WAGR rollingstock.
Z9 - The Model
 |
| WestOzModels Z9 |
During early 2010 I commenced down the path of researching
and producing a model of AGS 22 the WAGR shower car (as previously blogged). At the time I was
convinced by others in the S scale group that I should have a go at producing
the AGS as a urethane kit, and so after some deliberation I decided to give it
a go. With the basics of the AGS body framework complete, I decided that I
would replicate that framework again to build a model of Z9 at the same time,
as I considered that this was then a easy scratchbuild using castings of the
floor and roof parts from the AGS project to achieve a model of sister car Z9. I also considered that it was an easy scratchbuild for anyone else to produce and thus not worthwhile progressing into a kit of its own. Construction
of these two cars would compliment my ARS, AQZ and AV cars to enable operation
of a “Reso” style train. Work on these projects continued throughout the winter
and in Oct 2010, the Z9 scratchbuild and the AGS 22 kit prototype were
completed, with the AGS kit released for sale to members of the S scale group
at the November meeting.
 |
| Scratchbuilt Z9 and AGS 22 kit completed in 2010 |
During the following months some needling by group members
took place, asking me to consider making a kit of Z9, something I was not
really keen to do as I now already had a model of this vehicle. To make a kit
would mean doubling up and I really wanted to move on and so consideration
turned to some other projects until early in July 2012, I found some interesting pictures of
Z9 (above) whilst scanning through the “Rail Heritage WA Archive Photo Gallery”. The
main picture (P-6549) showed a version of Z9 I had not seen before and made me realise that
most existing models made of Z9 were based on a much later 70’s – 80’s period and in
the form we know it to be, in preservation today. Further research revealed a
much nicer version of Z9, with roof and car body detail that I could not
resist, and so later in July, armed with measurements I had taken from the real
Z9 at HVTR’s Dwellingup carriage shed on a previous visit, work commenced on
patterns for a new model/kit.
 |
| New side patterns for Z9 kit |
As the model would use parts from the previous
AGS kit, it only required making patterns for the 2 car body sides and the end
wall. Existing AGS parts included the roof, floor/underframe and the platform
end decking. These patterns were retrieved from storage and prepared for use
whilst making the new parts. This enabled a new Z9 version to come to life relatively
quickly with the first roof, side and end castings being turned out in the middle of August and a
prototype body was soon assembled.
 |
| Basic assembled body next to an AQZ |
Some
time was then taken organising a new brass etch for a “lazy S” style gate to
enable the car to have suitable platform end gates. The new gate etch arrived
in late October and work recommenced on completing the prototype for the Z9 Kit.
 |
| Gates, underfloor roof and general detail added - ready to paint |
After spending the first week of November in the paint shop, the new Z9 was
completed, exactly 2 years to the day from my first Z9 scratchbuild. Kits became
available at the November S scale meeting that following week.
 |
| Painted Lazy S End gates |
Although I never intended to produce a second model of Z9, I am now happy that I did. The project has helped me to improve my skills and enabled a much better model than the one I originally scratchbuilt. It also caused me to look at and explore some other areas of modelling which I had not considered previously, so it ended up being a worthwhile exercise.
 |
| Completed Z9 kit prototype. |
This kit by WestOzModels is now available, although stocks are limited.
Essentially it is a "Body" kit only, with some detailing parts
(specific to this car) included.
The modeller will need a basic grounding in assembling of
urethane kits and a reasonable level of modelling skills to complete the
model.
Prototype information complied from “A History of WAGR Passengers
Carriages” by A. May and B. Gray and
Sunday, November 18, 2012
SIGnallingWA
For those interested in signals, signal boxes etc. check out the new site from Chris French.
To find specific signal cabins look in Signal Cabins of WA - Archive, even better buy the book in the Shop.
A must for the modeller of the WAGR in any scale.
http://www.sigwa.info/index.html
To find specific signal cabins look in Signal Cabins of WA - Archive, even better buy the book in the Shop.
A must for the modeller of the WAGR in any scale.
http://www.sigwa.info/index.html
 |
Rail Heritage WA - P6777Signals, signal box, Box "B", Midland |
Monday, October 29, 2012
AY- AYB models Early Livery
Here is a couple of pics of some modelling done by Ross Green who has been with the S scale group for some time now. Ross has built these AY & AYB cars using WestOzModels kits, to run with his Dd & Dm suburban tank locomotives which he has previously scratchbuilt.

Ross has chosen to paint his cars in the earlier Larch Green, Light Green, Cream and White livery which the carriages wore when they first entered service in 1945.

Ross remembers travelling in these carriages in this colour scheme as a young lad and wanted to recreate that period for his models.
There was much discussion, questioning and research that took place before paint was applied, as to what would be the correct combination of colours & how/where it would be applied to areas on the carriage.

Ross has mostly completed these models and brought them along to the recent running night to show others where he was at with the project. I think we all look forward to seeing this train of carriages running with one of Ross' D class tanks at the head of the train.
Subscribe to:
Posts (Atom)