Sunday, January 29, 2012

Concertinas for Passenger Cars

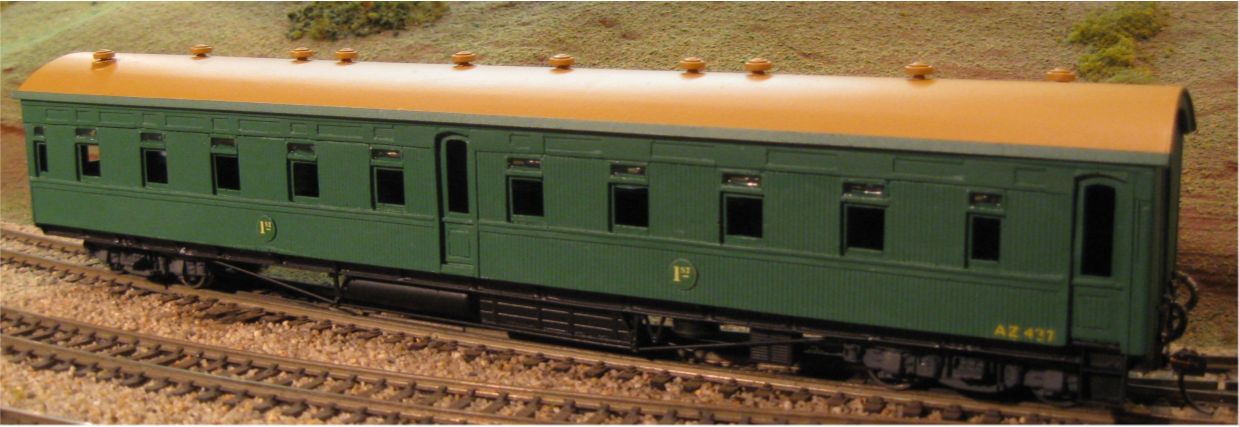
After construction of my first AZ 1st class passenger coach seen here below, I knew there was something missing which I wanted to add - between car "Concertinas" but knew not how I would achieve it. The carriage looked bare and needed that something to finish it off. Previous efforts by members to achieve the look of corridor connections between carriages had usually resulted in a section of folded black cardboard to resemble the concertinas. An effective answer as the cardboard could be set up to spring in and out as the cars moved around a layout but the the look was not to my liking - I wanted better.
After several days of passing by the railway museum an being distracted by the concertina on the end of the JV passenger car, I knew I had to do something about solving this problem and so with a few days off looming, I started racking my brain as to how I would get a look I would be happy with.
Having been a modeller of British LMS for some years it came to mind that Airfix and Hornby etc had used a moulded concertina which looked good but with the hook and drawbar style couplings was always quite some distance apart - could it be used in a close coupled situation on WAGR S scale equipment?
On arrival home I dug out a British example of the concertina, produced a pattern scaled up to S scale size and moulded it, enabling a casting to be turned out.
After producing 2 castings of the concertina I then began to look at how it would need to be fitted to a carriage to make it work. As I only have 1 Az completed, I needed to find a matching pair of carriages to apply them to - the only other cars I had were ADU's from the "Wildflower" set which I had never applied a concertina to, for the same reasons outlined above. Perfect! and so I set about fitting and testing - the end result (see pic below) being that with some sanding of the back of the concertinas I could get them to fit to the cars with a 3mm gap between the front of them which allowed the cars to negotiate medium radius peco points and my 29 inch radius curves on my layout. Not Quite touching each other, but gave me an acceptable and practicle looking, working set of concertinas that i'm happy with for my models.

And so with the operating side of the problem solved, Next job was to fit the concertina to the AZ. The fitting went well and if you compare the top picture in this post with the one here below, I think you will agree that the carriage now looks more complete.


Since fitting of the Concertinas to the AZ, it has also be fitted with flush glazed windows and interior corridors and partions - Another project Finished! and seen here in the pic below


The Concertinas as a "Detailing" part, which should fit any of the carriages which used this type of passenger corridor connection on the WAGR, will now be available from WestOz Models at future S scale meets.

Tuesday, January 10, 2012

Kendenup Station

Further to my previous post on Tichy S scale doors and windows, I have made considerable progress on my model of Kendenup station, which I started just after Christmas.


The roof is a card mock-up at the moment as I am waiting on some plastic tile sheets to arrive. The rest of the construction is styrene, including Evergreen novelty siding (item 4083). I fabricated the chimmney from Wills OO scale brick sheet.


I scanned the above photo and some others I took at Kendenup in the mid 1980's and send them to Don Copley and Don has added them to his WA Stations web site.

Don also noticed that Kulin station building is very similar and there are some good photos of Kulin on his site also. The main difference is that Kulin station is built as a mirror image of Kendenup, with the brick chimney on the left end viewed from the track side. Kulin does not have the large door on the rear wall, and has a third window instead.

Close perusal of photos of Kendenup show joins in the weatherboards where the window was, indicating that the large door was a later modification. I am including the large door and associated loading platform on my model to match Kendenup as I photographed it in the 1980's, and the large door makes an interesting feature.

When completed, my model of Kendenup station will become Springdale station on my Marbelup Valley Railway. It just fits in the space available at Springdale.

Tuesday, December 6, 2011

MRWA/WAGR/WESTRAIL GE Wagon

I have been working on my next kit and its ready to be released.


I wanted to do something simple and to cover all eras I model.

This kit is the MRWA WAGR WESTRAIL GE Wagon, however its the outside braced version. Only 30 wagons of this type were made, originally used by the MRWA, however some survived right through to the Westrail era.

I have done some experimentation with kit building and wanted to do a one piece mould.


I originally was going to scratch build five of these wagons, but only ended up doing one side, one end and one inside detail piece. This became the basis for the pattern.

I then poured the rubber over the pattern and left to dry over night. The result gave me a mould to use so every side was exactly the same. I then modified by NA Sleeper wagon underframe to become the underframe for the smaller GE wagon.

I then put the pieces together just like any other kit. This formed the basis for the one piece mould. My first attempt failed beacuse I forgot to put a release agent between the teo pieces so I had to cut the pattern out and try again.


The result is a one peice mould, of a wagon that represents three different eras. Naturally I have 10 MRWA 10 WAGR and 10 yellow westrail wagons for myself, and will do some for others if they wish.


HAPPY MODELLING............................

Saturday, December 3, 2011

S Scale Detail Parts from Tichy Trains (US)

Just letting everyone know that Tichy Trains in the US has quite a few detail parts in S scale.

I have just ordered some doors and windows which are pretty close to the correct size for a model of the Kendenup station which I am planning to build for my layout (to go at Springdale). Kendenup Station had 8-panel double-hung windows, before they were covered up by shutters after the move to Katanning. If interested, there is some historical film of Kendenup from the 1920's including a train trip from Perth. The station in the film is an earlier, smaller building.

They do online orders so the parts are fairly easily available.

They also do some nicely detailed oil drums and a neat little crane.

Some of the HO items such as the pipe load could also be useful.

Thursday, December 1, 2011

ModelRail 2011 Videos

I went along to ModelRial this year to test a few things and took my video camera,

Here is a video of the trains running at ModelRail this year on Swanview...

Some nice stuff on display!


http://www.youtube.com/watch?v=6V8MKw2wvQM
My First Locomotive.

Like many others my first scratch built styrene model was a WAGR D class four wheeled open wagon.

This was promptly followed by a model of a R class open bogie wagon.  Satisfied with the results of both models, I then moved on to something of greater interest to me, end loading long distance country AQS passenger cars. 

Most scratch building projects require time to be spent on planning, making jigs and sometimes fabrcating items on a trial basis, etc.  These tasks are not as non productive as they seam, as they help the modeller devise the simpler, easier and cheaper methods of building  models.  In order to get the most from this time it I decided to build a pair of AQS carriages. 

As time progressed so did my skills and confidence in using styrene.  By the time I had finished the carriages  I was ready to build something to "pull 'em" with. 

As far as steam locos were concerned the choice was easy - a Vclass.  For me the V class epitomized what a modern narrow gauge railway steam locomotive was all about.  

I was advised that the "Bachmann Plus" 2-8-0 consolidation locomotive [item 31401] was most suitable donor mechanism for a V class and that Murray Hartzer had previously built a Vclass in brass using the same donor mechanism.

I used a piece of 32mm diameter electrical conduit for the boiler.  All the other parts, e.g. fire box, cab, running boards etc. were attached to the boiler. The boiler was attached to the donor mechanism in the same way as the original Bachmann body shell. 

In the case of the tender, this was also constructed using sytrene, except for the brass sheet used to form the upper curved pannels of the coal bunker.  "Rails West" components were used to detail the the model. 

The model was primed with Holts brand red primer and top coated with a spray can of Colourbond brand Rivergum Green.  Black letraset tape was used to line the tender and simulate the boiler bands. 
A light coat of Wattyl brand Matt Estapol was applied to the model to dull the gloss of the paint and seal the Letraset tape.  The model was then weathered using Art Spectrum brand soft pastels [chalk] and sealed with a second coat of Estapol.   

                                                A model of V class locomotive 1216.

Tuesday, November 8, 2011

Kadee #262 Draft Gear Boxes for Whisker Couplers

I recently replaced the couplers on a model of an X class loco with Kadee #156 long-shank "Whisker" couplers, but it didn't work very well because the mounting hole for the draft gear box supplied with the Whisker couplers needs to be closer to the face of the buffer beam.

I contacted the Kadee company by e-mail to point out the discrepancy with the mounting holes, and they suggested I try the #262 draft gear box, which is designed to work with the range of "Whisker" couplers but has the same mounting hole dimensions as the older #5 and similar couplers.

I recently obtained some of the #156 draft gear boxes (20 to a pack, couplers not included) and have now completed the coupler conversion on the X class.

The #262 box has several useful features including:

* narrower than standard draft gear boxes which provides greater clearance for bogie swing on tightish curves,

* mounting hole is the same distance from the front face as standard draft gear boxes, so it is easy to fit or retrofit Whisker couplers to rolling stock designed for #5 couplers or similar,

* minimal vertical slop, so coupler height is more precise,

* snap-together design, so no gluing required.

If you are not familiar with Kadee Whisker couplers, these have very fine wire springs permanently attached to the coupler shank to provide centering, rather than the spring formerd from phosphor bronze sheet which is standard for #5 and similar couplers. The "Whisker" centering springs require less force to move the couplers sideways, so they work better with magnetic uncouplers, especially for delayed uncoupling.

Whisker couplers are easier to assemble as they don't require a separate centering spring, and the coupler boxes, either the supplied type (#242) or #262 type, snap together so the coupler stays together without gluing. Whisker couplers are available in both standard size heads (same as #5) and "scale" size heads, as well as several different shank lengths. For example, #158 has the "scale" head with the common, medium length shank, and #156 has the "scale" head with a long shank. The long shank couplers are particularly useful for WAGR steam and diesel locos with cowcatchers as they space adjacent wagons far enough away so the opposing "glad hand" does not get caught in the cowcatcher which can cause uncoupling or derailment.

Also, the rear of the draft gear box can be shortened by about 3 mm, without affecting operation, which is often useful to provide greater clearance for the front bogie of a steam loco, or for long bogie wagons or coaches. In these situations, there is an even smaller draft gear box, the #252, which can also be used.

The #252 and #262 draft gear boxes will not work with non-Whisker couplers, as there is insufficient room for the phosphor bronze centering spring. The #242 draft gear box will work with #5 and similar couplers, as well as with whisker couplers. Incidentally, the shanks on the Whisker couplers are slightly thicker so they are equivalent to a #5 shank plus the thickness of the #5 style phosphor bronze centering spring, which is why the #242 draft gear box will work with either style of coupler.

If you are a prolific wagon builder, it is also possible to buy the common Kadee couplers such as #158 in bulk packs of 50 or 100, without draft gear boxes, and buy the desired draft gear boxes separately. This actually works out cheaper than buying them 4 at a time.